
To get optimal results, there are many self-care techniques to consider before and after microneedling. A patient’s process will vary depending on the target area and whether the procedure is done in-office or at home. In this article, we will walk you through the process of in-office and at-home treatments: providing you with microneedling before and after pictures, recommendations, and things to avoid to ensure excellent results.
Table of Contents
- The Purpose of Microneedling
- Microneedling Before and After: In-Office
- At Home Microneedling Before and After
- What To Expect After Microneedling
- Risks & Side Effects
- Final Tip
The Purpose of Microneedling
Microneedling is a minimally invasive cosmetic treatment that creates multiple tiny punctures in the skin. The goal of the procedure is to stimulate the body’s natural healing cycle, as the technique can be done on most parts of the body.
The tiny injuries or punctures induce the production of new collagen and elastin. This forms new connective tissue which helps diminish any cosmetic defects.
Most undergo a microneedling treatment to improve the following:
- Texture and tone
- Acne Scars
- Enlarged pores
- Stretch marks
- Wrinkles and fine lines
- Age spots
Microneedling Before and After: In-Office
Medical microneedling is an office-based procedure and is administered by a licensed professional or board-certified dermatologist.
In-office microneedling treatments are generally more expensive but often produce better results. Each session can cost between $100 to $800.
Generally, four to six microneedling sessions are recommended before the full effects of the procedure become evident.
In-office treatments use FDA-approved devices with extremely fine needles that have the ability to penetrate deeper. These automated devices operate with more safety and efficacy than at-home tools.
Let’s walk through the process of microneedling before and after an in-office procedure.
What To Do Before Microneedling
A scheduled consultation will be set to determine what treatment best suits your skin and condition. It is important to identify any skin irregularities or disorders prior to the procedure to make sure you are medically cleared.
The presence of a former skin condition such as eczema, rosacea, or active acne can lead to infections and make conditions worse. Women who are pregnant should also avoid microneedling, even though complications are extremely rare.
After the consultation, you will be provided with microneedling pre-treatment instructions. Here are some general guidelines:
- In the month leading up to the treatment, avoid direct sun exposure or any laser treatments on the target area of the skin.
- Limit the use of any anti-inflammatory or blood-thinning drugs in the week before the treatment
- Avoid using any exfoliants, alcohol-based cosmetics, retinoids, hair-removing creams, or waxes, at least one week before
- Acne medication such as Accutane should be avoided at least six months prior to your scheduled microneedling treatment
Sticking to a healthy diet and skincare regime before and after microneedling is the foundation of producing optimal results.
Day of Treatment
On the day of your micro needling session, avoid using any makeup or lotion before arriving for your appointment. Simply cleansing your face with an all-natural cleanser and cool water is sufficient.
Inform your physician of any medical changes that might have occurred since the last visit.
The physician will cleanse the treatment area and apply numbing cream or a topical anesthetic agent at least thirty minutes before the procedure. This is to help with any discomfort associated with micro-punctures of the skin.
If you opted for PRP microneedling, a small blood sample (5 to 15 mL) will be taken as soon as you arrive and put through centrifugation to obtain platelet-rich plasma.
Make sure to snap a photo so that you have some before and after microneedling pictures to compare. Sessions rarely ever take more than 2 hours.
Microneedling Post Treatment
After your session, a moisturizer or serum containing Hyaluronic Acid (HA) is generally applied to help boost the healing process.
Avoid direct exposure to sunlight or heat and restrict the use of anti-inflammatory drugs or heavy makeup. Low-potency paracetamol or Tylenol (acetaminophen) can be used to reduce any pain or discomfort.
Avoid washing your face for the first 24 hours. The skin can be treated with warm water four hours post-treatment but without a cleanser.
An aftercare regimen will be described by your dermatologist based on your desired results and targeted area. Necessary aftercare tips for all the microneedling healing stages can be found here. The correct selection of products to apply after your treatment will be vital to your skin health.
Most resume their daily activities right out of the doctor’s office.
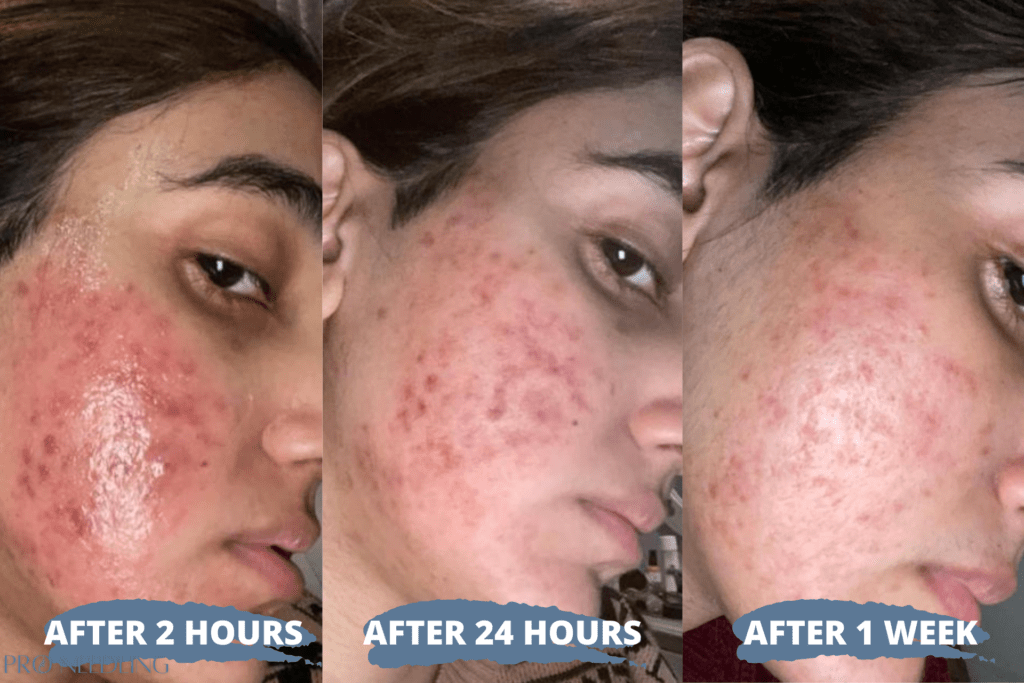
Microneedling Before and After 1 Treatment: Microneedling Immediately After (Left), Microneedling Day 2 (Middle), and one week after microneedling (Right).
These microneedling before and after pictures above were from an individual who was treating acne scars. The patient from the photos stated, “Since my acne scars are so deep, I figured I would need about 4-6 sessions of microneedling before I would see results. The skin has actually gotten much smoother just one week after my first microneedling session.”
At Home Microneedling Before and After
While microneedling was once a specialized procedure done only at dermatology clinics, it is now available as an at-home treatment.
At home devices are available for as low as $30 for users to try this DIY alternative. These tools use shorter needles that generally won’t penetrate as deeply and as accurately as an in-office tool.
At home treatments can be a good alternative when treating issues like uneven skin tones, large pores, wrinkles, and fine lines. The user can expect less effective results if trying to treat deep issues such as acne scarring.
How To Prepare for Microneedling at Home?
Prior to the treatment, the user should be educated on how to properly use a microneedling pen or roller device. This includes knowing the correct needle depth, method, and pressure needed for the issues being targeted.
Make sure you properly clean and sterilize your device before and after microneedling. Since there is no professional oversight, these pre-microneedling care instructions are crucial to avoid damage and infection.
Make sure to take a before photo to compare later on.
Day of At-Home Treatment
Cleanse your skin thoroughly before the procedure with a gentle cleanser to ensure optimal results. It is optional to apply a nutrient serum or toner as a base for your needling device.
Similar to in-office treatments, it is advisable to use a Hyaluronic Acid (HA) serum before and after the microneedling procedure to help your skin repair itself better.
Depending on the area, the treatment should only take about 5-20 minutes.
Post At-Home Treatment
Rinse your face after the procedure and disinfect your device for future use. You can apply nutrient products like growth factors, copper peptides, and vitamins A, C, or E, onto the skin. Allow the products to absorb for a few minutes before using moisturizer.
A gentle cleanser and mineral makeup can be applied the next day. Natural oils, chemical-free cleansers, and cool water can work magic for your skin and keep the inflammation at bay.
It is best to avoid alcohol-based products and heavy makeup in the days after derma rolling.
It is completely normal to feel a slight burning sensation and/or redness in the first three days. Swelling is pretty apparent right after your treatment and can often provide volume in thin areas, like under the eyes.
Towards the latter half of your first post-microneedling week, you might experience flaking of your skin. This is a great sign, as it signifies the regeneration and healing process are underway.
More than a week after your treatment, most of your initial symptoms, including burning/prickling, redness, and flaking will subside. At this point, you can slowly resume your regular skincare regimen.
What To Expect After Microneedling
Results! While it is unrealistic to expect any cosmetic procedure to work after one session, it’s not uncommon to notice more radiant and smoother skin the week after your microneedling treatment.
You will likely need to undergo three to four sessions (one session per month) before you experience the full range of positive effects. Expect your skin to heal completely within two to three weeks if you have correctly followed the aftercare regimen prescribed by your physician.
Those who are microneedling at home can work their way up to multiple sessions per week if their skin reacts well to treatments.
People often have to repeat the entire process after a year or more depending on their individual results, skin type, and sensitivity. Positive effects can last anywhere between three to six months.
Risks & Side Effects
Typically, microneedling is a very safe and well-tolerated cosmetic procedure. There is enough clinical and anecdotal evidence to suggest that the treatment does not carry any major adverse effects.
Redness, swelling, flakiness, dryness, pinpoint bleeding, and bruising are some of the most common side effects observed in people who undergo microneedling. Again, these side effects tend to subside within a week of the treatment.
The most common risk of microneedling at home is using unsterilized devices or damaging the skin by not using the tool correctly.
Most risks can be avoided if you attend an in-office consultation and procedure. Report any pre-existing skin or systemic conditions to your physician along with your medical history.
Final Tip
Microneedling can generally be done on people of all ages, skin types, colors, or ages, with minimal risk of side effects. It’s a great alternative to invasive treatments and for people looking for results without a long recovery period. Results will vary based on the type of skin and the condition treated in each patient. Make sure to take microneedling before and after pictures to really notice how effective your treatments were.